Fieldwork & Film
The Fieldwork
Last year, we placed seven time-lapse cameras at the margins of Kronebreen from May to September 2014, capturing images every 30 minutes. These were intended to collect high-resolution surface velocities, calving rates and surface lake size that would complement findings from a continuous record of bed water pressure.
Five out of seven of the time-lapse cameras worked. Cameras 4 and 7 were recycled from a previous installation, but only worked for a week due to a power shortage. Unlike the Canon 600D camera, the Nikon D200 camera cannot enter a sleep mode and consumes more power on standby and during image capture. The five Canon 600D cameras successfully captured images throughout the season, except one which fell over two weeks before they were collected. It is suspected that one of the drilled bolts stabilising the tripod popped because of freeze-thaw expansion.
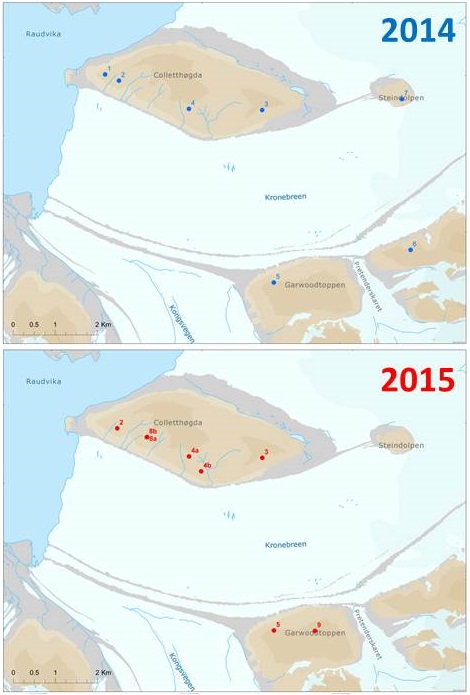
The positions of the time-lapse cameras in 2014 (top) and 2015 (bottom). Map source: Norsk Polarinstitutt (toposvalbard)
The images were used to obtain surface velocities and calving rates using a series of photogrammetric techniques - feature tracking, image registration, and image transformation. We underestimated the value of the data from these cameras though. The quality of the data far surpassed our intention to use as a complimentary aid to the bed water pressure record. The higher resolution gives greater insight into short-term velocity changes, and could be used to examine calving behaviours. Therefore we decided to re-deploy the time-lapse cameras to capture images over summer 2015.
In May 2015, 8 cameras were installed at Kronebreen. Four of these consisted of new sites that required location scouting and tripod installation, whilst the other four re-occupied sites from the previous year. These were positioned at the glacier margins as pairs to enable stereoscopic photogrammetry. Stereoscopic photogrammetry is the extraction of meaningful data from two sets of images focused on the same target. Unlike monoscopic photogrammetry (analysis using one camera), common features in two image sets can be triangulated to create a three-dimensional representation of the surface (i.e. a Digital Elevation Model – DEM). This is a reliable way to gain absolute measurements as it is more accurate in the translation from pixel to real-world distances.
It took three days to deploy all the cameras, with the help of a helicopter (and pilots) to ferry us around the mountains adjacent to Kronebreen. We shared helicopter time with Jack Kohler (Norsk Polarinstitutt), Katrin Lindbäck (Uppsala), Ankit Pramanik (Norsk Polarinstitutt) and others, who were GPR surveying a number of glacier in the Kongsfjorden area. Therefore we had to coordinate helicopter drop-offs, and make sure we were ready and organised for pick-ups. Our helicopter pilots Jon Arve Ramstad and Gunnar Nordahl were very flexible and also really curious about the work we were doing, often helping out with carrying equipment (and teaching us swear words in Norwegian… essential stuff).
Day 1
Our team of four were first dropped off at camera sites 8a and 8b, with the intention being to split into two groups to work simultaneously on each camera. We managed to find a site with prime viewing over the glacier front where both cameras could be installed, roughly 10 metres apart. My supervisors primarily worked on camera 8a, which is paired with camera 1, focusing on the calving front. Heidi and I worked on camera 8b, which is paired with camera 4a (up glacier). The ground was very dusty, with a loose surface roughly 3 inches thick. Beneath this was hard impenetrable permafrost, so it was very difficult to either bury or bolt the tripods. We had pre-empted this, and had the idea of using buried anchor plates to stabilise the tripods – guide wire attached to the tripods is threaded through metal plates which are buried in the ground. All went smoothly bar the loss of my supervisor’s bag (and his down jacket which held sentimental value having been with him on a trek across Greenland), which went tumbling downhill into the glacier as he was collecting large rocks to anchor the tripods.
The group split up from here, with Heidi and Doug dropped at camera site 1 to dismantle the tripod we left there last September, whilst my supervisor and I went to camera site 2 to install one of our camera boxes on an existing tripod. These two tripods have been here much longer than the others (since 2012 approx.), so are heavily frozen into the ground. Heidi and Doug resourcefully used hot water from their thermos flasks to melt the surrounding ground, so they could extract the tripod from camera site 1.
It was here that we could really observe the changes at the calving front. Over the winter, the calving rate has reduced, causing the front to stretch forward. Velocities tend to be low so little ice is replaced from up glacier, hence the ice near the front simply advances by stretching and thinning. We hope that the cameras will capture changes at the front over the summer, when the calving rate front is much higher and the ice cliff will steepen as the glacier retreats back to thicker ice. Our day ended after we placed another of our camera boxes on a tripod at camera site 3, which was installed in May 2014.
Day 2
On the second day, Heidi and Doug collected a GPS box from the glacier surface and recovered a tripod from camera site 6. The GPS had been logging its location since September 2014, and can be used to measure the glacier surface velocity. This can be compared to the surface velocities derived from the time-lapse images as a measure of confidence. Meanwhile, my supervisor and I were in the research station putting the final touches to the remaining time-lapse camera boxes – programming the camera timers, configuring the electronics, calibrating the cameras, mounting the solar panels on to the tripods etc. etc. This preparation is crucial to our field installations running smoothly.
Day 3
On the third day, Doug and I were dropped off on Garwoodtoppen (the mountain to the south of Kronebreen) to install cameras at sites 5 and 9, whilst my supervisor and Heidi were on Collethøgda installing cameras at sites 4a and 4b. The installations on Garwoodtoppen largely consisted of digging. Lots of digging. The permafrost is much softer on Garwoodtoppen, meaning the tripod legs can be dug in and there is less need for guide wire anchoring. We had four hours to install the two cameras with one (blunt) ice axe between us and a half hour walk between camera sites. I originally invested in some DMM Fly ice axes to encourage me to get out in the Cairngorms, but I am ashamed to say that they have seen much more digging action than climbing. Timing was tight, but we managed to install everything before the helicopter picked us up.
One team were dropped at camera site 4a, where we installed a tripod last year. From here, they scouted out the location for camera 4b. It was initially thought that camera 4b could be installed within close proximity to camera 4a, but there was little good ground and the glacier was hidden from view by the mountainside. They eventually found a suitable site 1 km away that was right on the edge of the mountain top, consisting of little permafrost and exposed gypsum bedrock. Here, they drilled expansion bolts into the bedrock to stabilise the tripod, and gained a terrific view of the mid-section of the glacier tongue.
With the eight cameras installed and the team finished within the allotted time, the helicopter pick-up went smoothly and we returned to Ny Ålesund…
…until worry set in that the cameras were programmed wrong or the tripods were not well anchored or the GPS locations were not exact etc. etc. Luckily a window opened up the next day when the weather was calm and the helicopter was free, so we re-visited camera sites 4a, 4b, 5 and 9. We worked from 8pm till midnight taking accurate GPS locations, better anchoring the tripods, checking the cameras were working, and downloading the first 24 hours of data. Thankfully everything was working, which gave us some reassurance that the cameras would survive the summer.
In September 2015, myself and UNIS post-doc researcher Sarah Thompson will be returning to Kronebreen to collect the cameras in.
The Film
We started filming our fieldwork in May 2014 when Silje (Smith-Johnsen, UNIS masters student), Heidi and I thought it would be fun to take GoPro cameras to Ny Ålesund. We filmed the first deployment of the time-lapse cameras at Kronebreen, which successfully captured images of the glacier from May to September 2014. After the fieldwork had finished though, we found ourselves with lots of raw footage that we knew we would rarely look at again in its current state. Therefore we decided to compile all the footage in one place where it could be edited into a short film consisting of footage highlights. I had all the equipment and software to do so, as I had originally wanted to study art, film and animation at university.
The result was a four minute film that summed up the focus and mood of the fieldwork – intense, challenging, and fun. At this stage, I showed the film to my supervisor who was really enthusiastic about it and contributed some great close-up footage of Kronebreen’s calving front. The film was then passed on to the UNIS webmaster, who uploaded it to the UNIS Youtube page and has clocked up over 1000 views and been used for outreach purposes on numerous occasions. Along with the follow-up fieldwork film of the camera retrieval and the video of the time-lapse image sequences, the films have been featured on NRK and ITV News. The response was overwhelming. I was completely surprised by the enthusiasm displayed by all I showed the films to. I love making them, and it is such a bonus that they have been well received.
As this trip came around, we decided to take the cameras again to film the fieldwork. My supervisor joined the GoPro crew, with a chesty harness along with Heidi, and I decided to go with a head strap to get better POV shots. They also shot footage with his Panasonic Lumix GX1 camera, which proved really useful for steady landscape shots that I could stabilise in the editing stage to produce smooth, detailed footage. We also had automated time-lapse settings on our cameras, which proved really useful for producing time-lapses of our installations. It was difficult to film at times as the cold temperatures would often diminish our battery life, but overall, we shot roughly 12 hours of footage.
Over the course of three fieldwork films, I’ve come up with a couple of my own personal do’s and don’ts when it comes to filming, editing and producing:
1. Always remember that the fieldwork and the research is the highest priority
The work will always come first. This is why we use GoPro cameras, as they are hands free and easy to operate. Once recording, you can just forget about them and focus on the fieldwork. Also, I try not to let film editing and producing eat into my PhD work time – I am completely guilty of this sometimes (e.g. I am currently writing this in my office in the middle of a weekday with work deadlines looming and future fieldwork creeping up fast), but I am trying to get better!
2. Welcome people who want to be involved
Give them a camera, ask them to get specific footage, show them a rough cut and ask for advice, anything! I always need that extra bit of footage or feedback. And I make an effort to acknowledge everyone who helps out. So many people are involved in our fieldwork films and their roles often crossover, so I have tended not to specifically assign people’s roles in the credits.
3. You don’t need expensive equipment to make a good film
Although good image and sound quality can enhance a film, it is the content that ultimately dictates how good the film is. Only invest in good equipment if it will improve the content. The previous films largely consisted of footage highlights set to music with the odd bit of text for context. I wanted to make this film much more informative, so decided a voiceover would be the best way to present more information without detracting from the film content. Reluctantly, I did the voiceover myself as I didn’t have the time to coordinate others to do it (that pesky thing called a PhD kept getting in the way). After brief trials with in-built camera and laptop microphones, I found that their sound levels were inconsistent and promoted a muffled tone (it was also very eye-opening for me as it demonstrated to me how much I mumble). The quality detracted from the message of the film, so I bit the bullet and bought an external microphone (a RØDE VideoMic Pro microphone), which really improved the clarity and tone of my voice. This is an example of investing in equipment to improve the content.
4. Securely store all your footage
As we have to be really careful storing all our time-lapse images, we have a lot of external hard drive back-ups (I think we currently have the images stored in 5 separate places, with 24TB of allocated external hard drive space in total). I also keep all the footage from each field season, which was particularly useful for this film as I could use old footage to compare the state of the glacier through time. Finding matching footage from the helicopter was incredibly lucky, and the time-lapse sequences are an obvious way to show the differences in the calving front between summer and winter.
5. Be brutal with editing…
Sometimes a piece of amazing footage has to be cut because it doesn’t fit in with the rest of the film, and often it can be hard to let go. For this film, we got some awesome footage of the calving front from sea level as PhD student Kristin Schild kindly offered me a boat trip in exchange for help with her fieldwork. In the end I had to cut it though as it didn’t blend well with the helicopter shots and it would have detracted from the overall message of the film.
6. …And also be patient
Film rendering has become the bane of my life. The dynamic maps and diagrams that appear at the beginning of the film took roughly 12 hours to animate, largely due to the rendering time (i.e. the transformation from a collection of edited film clips to a final continuous sequence). I think it has really paid off though, and I will be looking at transferring these animations to conference talks and presentations, so that painful 12 hours is not completely in vain.
7. Keep it short and sweet
I have a general rule to keep the films to less than 6 minutes, although I often don’t strictly keep to this. This is to keep it concise, and limit it dragging. I’d be really annoyed at myself if I managed to make glaciology somehow boring.
8. Use license-free music
Using copyright music limits the ability to share the video, and often ends it being taken down from Youtube because of copyright infringement. Hence, I usually dig around for license-free music. Often I explore small artists who offer free music downloads on sites like Soundcloud, or browse license-free music sites such as Incompetech, Bensound, and Mobygratis.
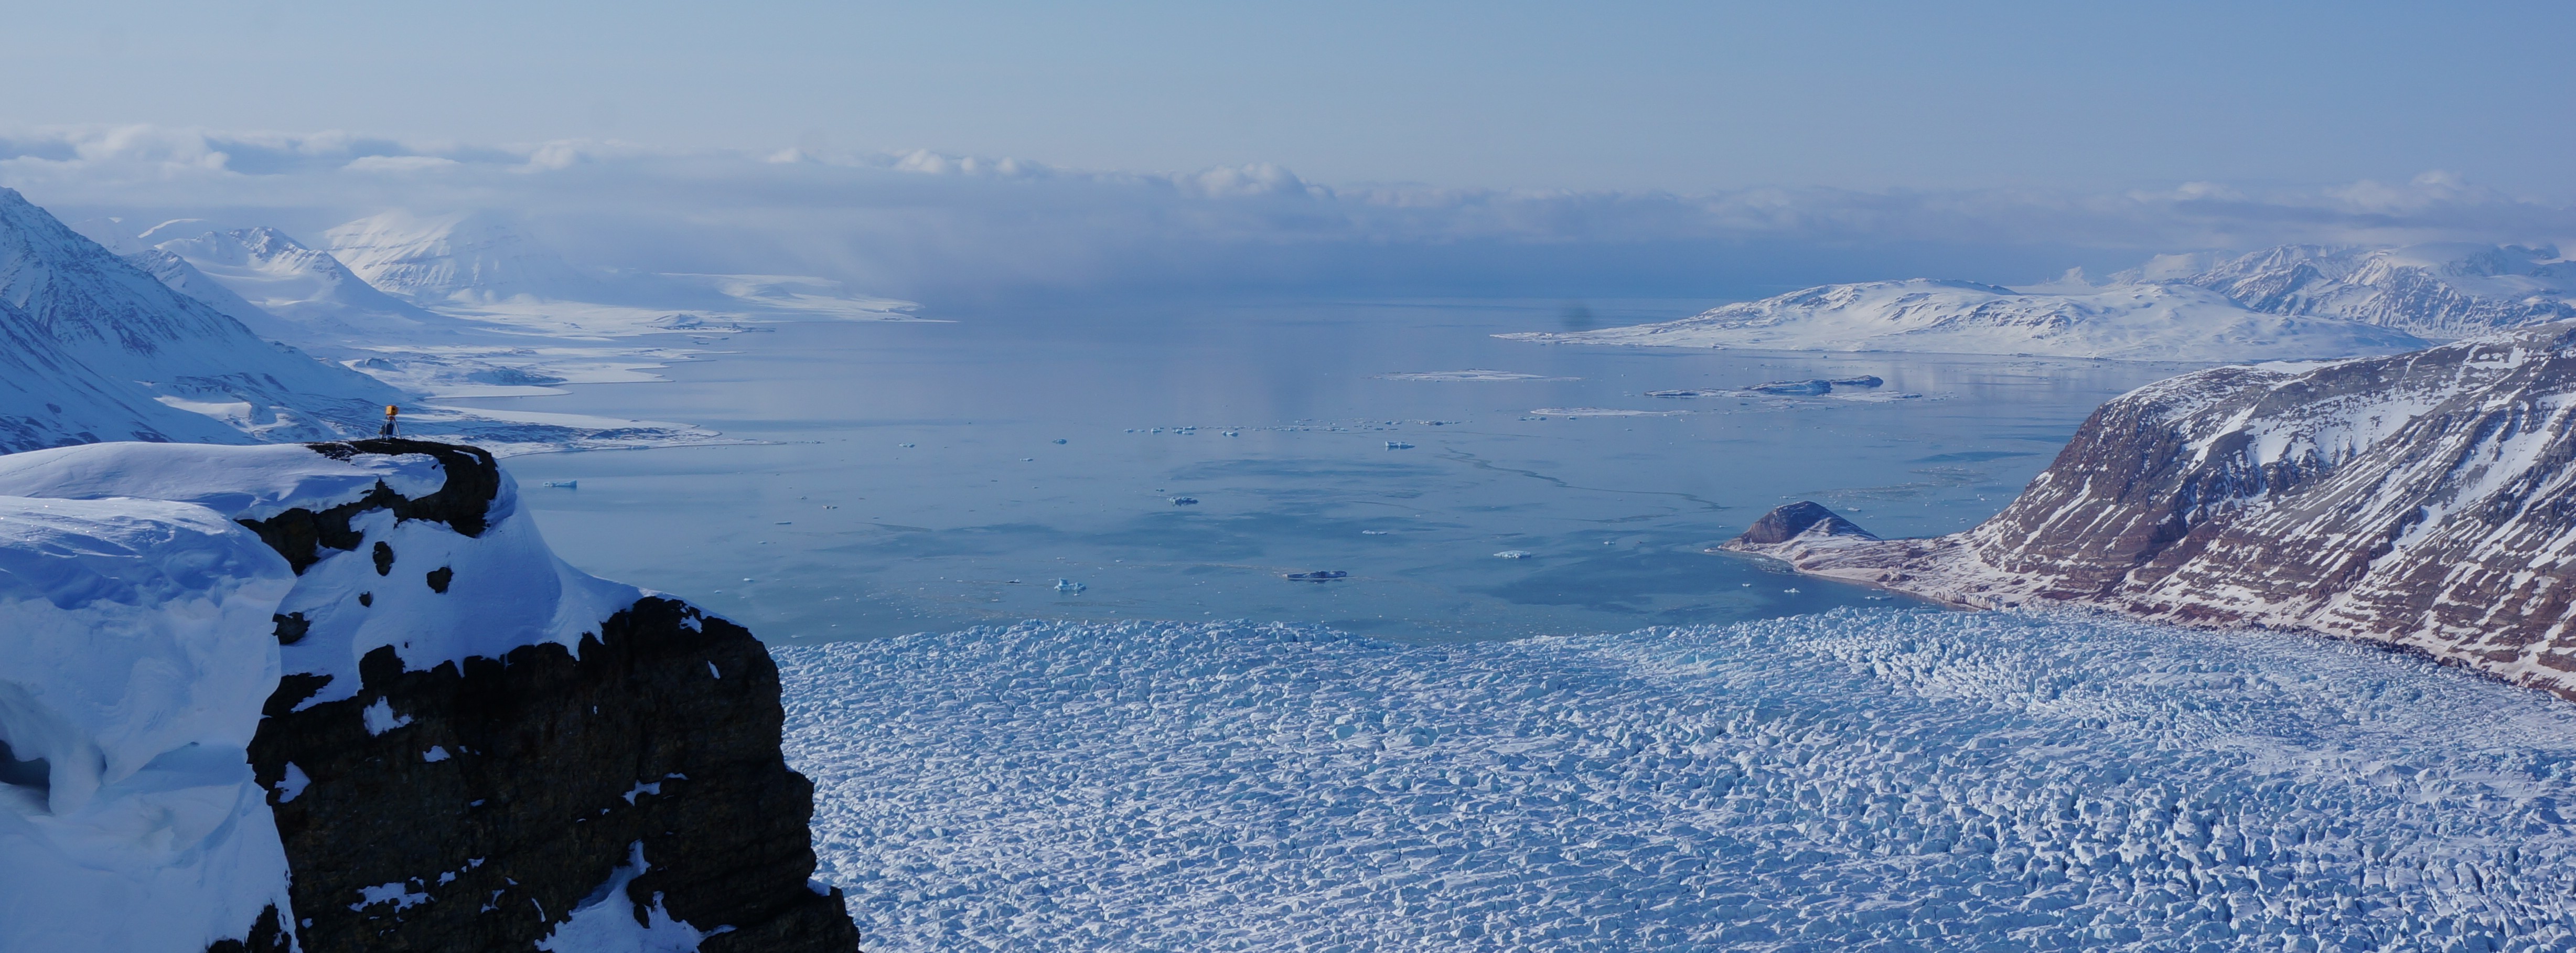
Camera 5 looking over Kronebreen
9. Consider who might watch the film
If you are aiming to use the film for outreach, the audience could be anyone from school children to academics. Although I personally don’t have a problem with swearing on camera, others might have a sensitive disposition to it. In the camera retrieval fieldwork film from September 2014, I kept in some swearing but bleeped it. In hindsight, I realise I should probably have just edited it out because it could limit the viewing audience. This time round, I made two versions. The uncensored version is a lot more comical, and in some ways also more real. The censored version is a safety net to make the film accessible to all. Better safe than sorry.
10. Always keep in mind the aim of the film
The aim of the previous films were to show others what we get up to on fieldwork, hence there was much more focus on presenting the footage in a chronological order that told a story. The aim of this film was to be much more informative and not merely repeat the previous formulae. I mixed up the ordering of the footage, with the voiceover dictating the structure of the film. It felt necessary to put the dynamic diagrams at the beginning of the film to give context to what we were doing and why we were doing it.
These are just my personal guidelines and I’m sure they will change over time. Next I’ll be looking to pack more information and technical glaciology knowledge into the films, whilst also keeping them entertaining. There is some pretty exciting fieldwork coming up at Tunabreen, as well as the camera retrieval from Kronebreen, which will be challenging and keep me busy for a fair while after. Watch this space (you may be watching for a while… just to give you some warning).